
1. Login to https://portal.azure.com with your developer account
NOTE: If you haven't set up Office 365 for your domain, Microsoft provides a detailed guide at: https://docs.microsoft.com/en-us/azure/active-directory/develop/scenario-web-app-sign-user-overview
2. Search for and select the "Microsoft Entra ID" service (formerly named Azure Active Directory).
3. Select App registrations from the side panel.
4. Register a New Application (if not previously performed) by clicking the + New Registration button/link in the center pane.
5. Fill out the registration modal and save the changes. It should look similar to the below example.
Make sure to select "accounts in any organizational directory...and personal Microsoft accounts..." as the "Supported Account Types, or this will need to be manually changed in the Manifest later.
6. Back on the "App Registrations" page, refresh the page. Select the application name you just created.
7. On the Authentication page, under the "Platform Configurations" section, click on the + Add a Platform button.

8. When given choices for the platform, select Web.

9. In the Configure Web panel, enter one of the required Redirect URIs, the Logout URL, and select both token choices (Implicit Grant for "access tokens" and "ID tokens").
Click Configure at the bottom of the Configure Web panel when finished.
Redirect URI
https://portal.companyname.com/portal/msal.php
Logout URL
https://portal.companyname.com/portal/login/logout

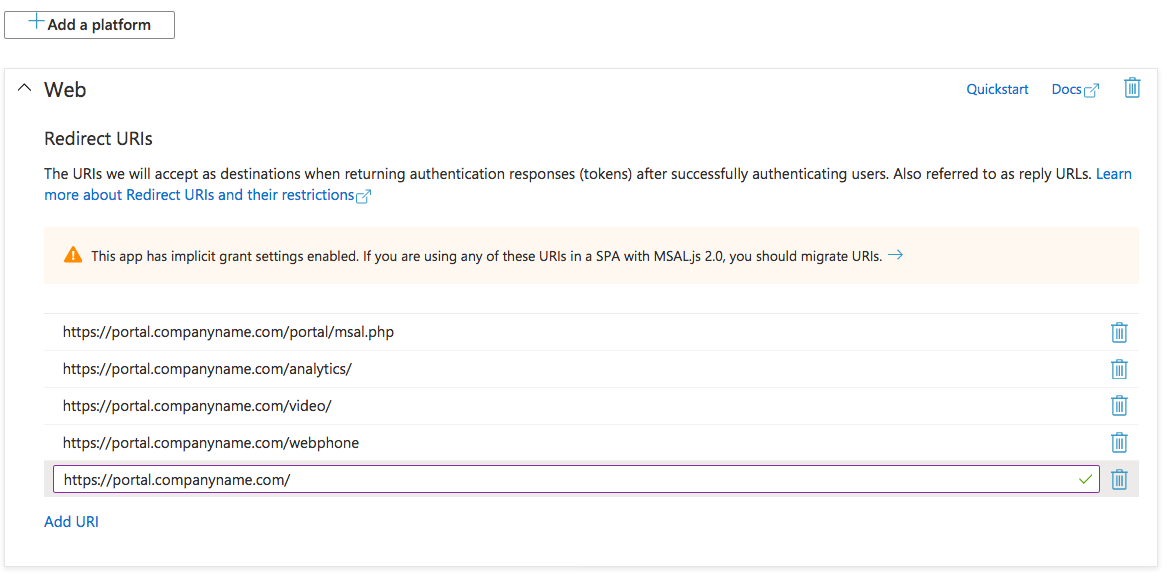
10. Back on the Authentication page, click on the Add URI button.

11. Add the remaining required "Redirect URIs" here. Required Redirect URIs are as follows:
https://portal.companyname.com/portal/msal.php (added in step #9)
https://portal.companyname.com/analytics/
https://portal.companyname.com/video/
https://portal.companyname.com/webphone {no trailing slash)
https://portal.companyname.com/auth/
https://portal.companyname.com/
The Web panel should look similar to below:
12. Click the Save button at the bottom of the window. Your Office 365 SSO service will now be fully configured and enabled on Microsoft Entra ID (formerly named Azure Active Directory).

13. Send the 'Application (client) ID' retained from the step above to support.gigtel.com as well as the request to turn on the SSO option for your domain.
14. Once you have confirmation from support that your Client ID has been added on the GigTel side, Your Office 365 single sign-on service should now be fully configured and ready for use. However, you will still need to manually enable the SSO feature for each domain. You can toggle the feature from the portal's domain settings.
To see how to enable on your user see below:
Comments
0 comments
Article is closed for comments.